Showing posts with label Website Tips. Show all posts

Wednesday, March 5, 2014

How To Convert Photoshop Designs to CSS Website

Are you a kickass Photoshop person? Can you create amazing looking designs using your Photoshop skills? If so, you might find yourself creating web site mockups in Photoshop for clients and then passing on the design to web site coders to get the final product in HTML.
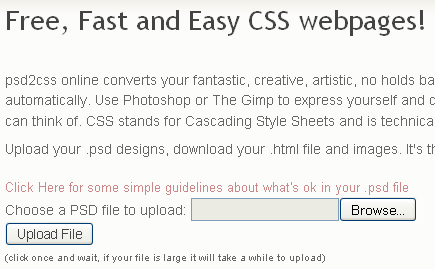
If you’re one of the many people who create web sites in Photoshop, you might be interested in a free online service that will let you convert your Photoshop design into a strict XHTML compliant CSS web site!
psd2css online
Trying to understand and code a CSS website can be a difficult and arduous task (thanks to Microsoft and there four versions of IE in the market!). It’s much easier, at least for me, to play around in Photoshop and create simple yet cool-looking designs.
PSD2CSSOnline is completely free and allows you to upload files in either Photoshop or GIMP, so if you don’t have a copy of Photoshop, you can use the free open-source photo-editing program, the GIMP.
psd to css
When creating your web site design, you need to make sure you use layers as this is what PSD2CSSOnline reads to figure out the different parts of a web page. The trick is to keep the parts of your page that you want separate in different layers of your .PSD file.
There are a couple of simple guidelines you should follow in order for this process to work.
  • Don’t make a bunch of layers – If you are an advanced Photoshop user, you might have created many layers that all combine together to make a single object. For example, your logo might actually be made of 5 to 6 different layers – but the logo is still one object. Do not upload the file with the logo still separated out into the 5 or 6 layers – merge them together into one single “logo” layer.
  • Opacity and Blending Options – You need to rasterize any layer with opacity at anything other than 100%. In Photoshop, you can rasterize a layer by right-clicking on the layer and choosing “Rasterize Type” or “Rasterize Layer“. In the Gimp, create an empty layer just below the one you want to rasterize and then right click on the new layer and choose “Merge Down”. This will rasterize the layer and merge it.
  • Modify Gimp Layer Sizes – For some reason the Gimp likes to make layers the same size as the image. This makes inefficient as you end up with lots of big image files in your web page. For any layer in the Gimp where the object is smaller than the whole page (most of your layers), click on the layer, then in the layer menu choose “Autocrop Layer”.
  • 4MB PSD File Size Limit – This is the largest file size that you can upload, but it was just a random number picked by the creator. You can email him and he’ll let increase the limit!
That’s all you need to keep in mind! Go ahead and create your web page in Photoshop or GIMP and then upload it to see how it turns out!
Hopefully, the look you had created comes out in your final HTML output. You can also try out a couple of other online services for converting PSD designs to web pages, but they are not free:
This service is also called PSD slicing, if you want to know the technical term for it. If you don’t feel like paying people to do this slicing for you and PSD2CSSOnline didn’t work out for your complicated design, you can do the slicing yourself!
Here are some cool tutorials and guides that you can read on how to design a site in Photoshop and then convert it into HTML:
While PSD2CSSOnline may not be the best tool for big designers, it’s a great way to get started if you’re not very familiar with CSS and HTML coding. And it’s free, so it’s always worth a shot! Enjoy!

Which Is Best? GoDaddy vs. HostGator vs. Media Temple vs. BlueHost

Looking for a good place to host your website or blog? There are a variety of different things that you should consider before choosing a web host. The thing about web hosting is, once you pick a host and get your website setup, it can be very difficult to switch hosts in the future.
Thus, picking a web host that will work great for you initially is key. Chances are, you have probably heard of the following hosting companies. Here is how they stack up as far as bang for buck, reliability, and overall deal.
MT

GoDaddy

Godaddy is one of the most popular web hosting companies, most likely due to heavy commercial advertising. Overall, Godaddy is a good webhosting company that offers just about any feature one could ask for in a web host.
Godaddy offers a do it yourself solution for just about any adjustment that you need to make with your domains and hosting. For example, with Godaddy, you can switch the primary domain on your hosting account yourself, by using the change of primary domain wizard.
Some smaller hosting companies do not officially offer a do it yourself solution for things like this. It can be done, but usually requires a call to customer support to have them do it. Godaddy does however, have one major con. They are always trying to markets something to you.
It’s not uncommon to get 2-3 emails a day from Godaddy that are marketing some product to you or trying to make you upgrade to something more expensive. Also, Godaddy does offer a surplus of more features than traditional web hosts. However, they also charge you for the majority of them.
Godaddy’s rates tend to fluctuate a lot, but they do offer a lot of promos which you should take advantage of. The right promo code will get you a domain for 7 bucks and 20% off of your hosting.
godaddy

HostGator

Hostgator is a very simple web host to use. They also have some of the best customer support in the business.When you purchase a domain through Hostgator, you are actually using Registry Rocket services to acquire the domain.
From there, Hostgator registers the domain name to your hosting account. This can be seen as a slight disadvantage. If you want to make domain changes on your account, you have to know how to adjust DNS servers yourself, and do it through Registry Rocket.
However, if you don’t want to bother with making changes like this, just send Hostgator an email and they will do it for you, no charge.  Hostgator has good uptime, and they don’t bug you with marketing offers.
Hostgator rates for hosting and domain purchasing are mid range in price for a web host. But, they do accept promo codes, which can save you a couple bucks here and there.
host gator

Media Temple (MT)

Media Temple is the chosen host by a variety of different labels including: Adobe, Diesel, JQuery, Starbucks, etc… They market themselves as a premium web host. MT’s UI software is unique, similar to Godaddy.
They don’t use cPanel like the majority of generic hosts. Media Temple’s hosting plans are really only suitable for sites that get a lot of traffic. Their prices are considered very high. The lowest Media Temple hosting plan starts at $20 a month, and prices only go up from there.
They do a decent job at not bugging you with marketing plots, and the letters that they do send you are often times useful. Media Temple support is decent.
MT

Blue Host

Blue Host is known for having some of the best hosting rates. Hosting plans start at $6.95 a month and most of the time you can get hosting for under $5 with a good promo code.
As far as reliability, Blue Host has had some trouble in the past, as many users have reported that their sites have gone down. However, Blue Host has gotten several positive reviews as well.
Similar to Hostgator, Blue Host uses the cPanel interface. Blue Host tends to stay on top of hosting trends and add features when necessary and demand is there. Support for Blue Host is generally good.
blue host

Conclusion

In conclusion, here is my opinion on the final ranking of the four web hosting companies.
1. Hostgator
2. Godaddy
3. Blue Host
4. Media Temple
Don’t agree? Tell us why you think the order should be different. Or tell us your favorite web hosting company and why it’s better than the four I mentioned here. Enjoy!

How To Make A Website Compatible For Smartphones

martphones grow in popularity with each passing day—much faster than cellularproviders can upgrade to faster, 3g and 4g networks to support the amount of data streamed by these phones. The most successful Web site owners realize the potential of mobile phone consumers and create a mobile version of their Web sites.
Unfortunately, few Web site owners have the time and money to invest in mobile phoneversions. This is where Onbile seeks to help by automatically converting a Web site for mobile compatibility with about five minutes of setup time.
logo
Start by creating an account. Choose a username and password, then enter your email address and agree to the terms of service. Click next step to proceed.
create account
Select a template for the mobile version of your Web site. The color scheme may be altered by clicking each of the boxes for background, title and buttons and choosing a new color. Click Next Step when finished.
template
The next step is to add content settings. For bloggers, this just means giving your feed’s URL. Then, you can either give the URL for a background, or upload a picture to use as a logo. Click Next Step when finished.
add content
Enter the domain address being converted to mobile format and click Publish.
publish
Almost done! A message proclaiming your site’s mobile transformation appears, along with a message to confirm your email address. Once confirmed, a code appears that must be pasted into the index file of your Web site.
success message
While Onbile is easy, it is not without faults. Some Web site owners report JavaScript errors. If using an RSS feed, the template choice is limited. In the terms of service, Onbile reserves the right to use advertisements at will—with no provision for Web site owners to choose the placement of such ads.
Overall, this is a great idea and an easy way for small Web sites to join the mobile phones community, but it is probably a short term solution. As a Web site grows, more professional interfaces are expected.